Thursday, September 30, 2010

I Love Balls!!!

Okay, I couldn't resist that title. I guess I'm 13 today. Anyway, here are the latest decor balls I've come up with. The coffee bean balls I've seen all over the web, but I have no idea who to give credit to. The suede balls were my own creation. I'm sure you've noticed that I like purposefully sloppy looking stuff. Must be the hippie in me.


Coffee bean ball - I used a tennis ball and fabric glue, and just glued as I went along. Spray paint the ball before glueing the beans on.


Suede ball - I used a tennis ball, fabric glue and strips of suede. I glued the strips on in random places until the entire ball was covered.


Here is a display of all the different decor balls I have made. I think I'm in love!!! I still have a few more different kinds to try out.

Wednesday, September 29, 2010

Slow Cooker Barbecue Chicken


The original recipe for this chicken can be found here, but I tweaked it a bit to fit the ingredients I had on hand. It turned out really well and got a big thumbs up from my boys.

You'll need:

6 chicken breasts
1/2 c balsamic vinaigrette
1/4 c brown sugar
2 tbsp soy sauce

I just put everything in the slow cooker for 8 hours on low, and shredded half way through.

Tuesday, September 28, 2010

Restaurant Review: "Buddy's Italian Restaurant" of Idaho Falls

When you're ready for a fresh, authentic Italian meal, Buddy's is there to oblige. So what can you expect from this spacious, elegantly decorated establishment? Here's my rundown.

At a first glance, I almost didn't believe what I was seeing. The menu seemed very expensive. Almost too much for a regular date night. I mentioned to my husband that we could just have a drink and go somewhere else, but he said we should just stay. The waitress came over and was very helpful. It turns out the $20 entrees are big enough for two people to share, and they come with a drink, an antipasto, garlic bread, salad, and dessert. We decided this was a good option for us. One of the entree options was two 1/2 orders of pasta with meatballs in your choice of marinara or alfredo sauce. Mike chose rigatoni in marinara sauce, and I chose ravioli in alfredo sauce.

The first thing to arrive was our antipasto and salad. I'm not a huge fan of fancy meats and cheeses, but Mike really liked them. there were about ten thinly sliced pieces of salami, pepperoni, and cheese on a little saucer, along with a couple of mini peppers. Very small, but tasty and unexpected. The waitress brought a huge bowl of salad. Definitely big enough for two. If I could describe the salad in a word, it would be.... refreshing. Finally, a salad I can actually dig in to! The lettuce was fresh and crisp, and the dressing was phenomenal. You don't get any dressing options, there is just the Buddy's dressing. But it's delicious so I didn't mind at all.

Next we gout our bread. The waitress had suggested that she really likes the garlic bread topped with cheese, so we decided to give it a try. It was crispy, garlicy, and cheesy... no surprises, but    still yummy.

It took about 25 minutes before we got our entrees. This seems like a long time, but they make their ravioli from scratch when you order it. It even says on the menu that it takes longer to prepare. I can see why. My ravioli was amazing. Just one bite and I was hooked. The ravioli itself was divine, but coupled with their alfredo sauce, to die for! I was intrigued by the one huge meatball on the plate. Interesting and unique. It tasted pretty great, too!

It would be unfair for me to review Mike's entree, so the rest of this paragraph will be in his words.  WILL UPDATE TOMORROW

Magic Cookie Bars


WARNING:  CONTAINS CALORIES

Oh man, I'm going to kill Whitney for introducing me to this dessert. I'm guessing I'm going to gain about 2 pounds this month, ha ha. My boys loved these silly things. Here's what you'll need:

1/2 c margarine, melted
1 1/3 c graham cracker crumbs
1 c dried cranberries or crushed walnuts
3/4 c butterscotch chips
3/4 c chocolate chips
1 1/2 c coconut flakes
1 1/3 c sweetened condensed milk

In a 9x13 pan, layer the ingredients in the order seen. Bake at 350 for 30 minutes or until coconut starts to brown. Allow adequate time to cool, then cut into 16 squares and enjoy!

Rice Ball

  Okay, so how many people thought this was a recipe??? Come on, be honest now. Gotcha!!! This is actually a post for more decor balls. I've seen pinto bean balls around, but I didn't have any beans of any kind. All I had in my pantry was rice. Still super cute and fun!


This isn't how my display is actually going to look, just wanted a picture of all the balls I've made together,

Sunday, September 26, 2010

I've Created a Monster!!!


Okay, so maybe not a real live monster. I have seen these types of toys for sale in the store for up to twenty dollars a piece. Kind of ridiculous if you ask me. So i got about seventy five cents worth of material and made one for Danny. It was a bit labor intensive figuring out a pattern and cutting all the pieces, but i really like it. I'm probably going to make ten or fifteen to sell at the craft fair. I will post a tutorial soon.

Saturday, September 25, 2010

Zesty Chicken Soup


A delicious chicken and tomato based soup, derived from my popular  "Taco Soup."

64 oz. chicken broth
4 skinless, boneless chicken breasts
1/2 teaspoon salt
1 teaspoon ground black pepper
1 teaspoon garlic powder
2 tablespoons dried parsley
1 tablespoon onion powder
3 tablespoons chili powder
1/2 onion, chopped
3 teaspoons minced garlic
1 (16 ounce) jar chunky salsa
2 (14.5 ounce) cans italian diced tomatoes
1 (28 oz ounce) can crushed tomatoes
1 (10.75 ounce) can condensed tomato soup
1 (15 ounce) can whole kernel corn, drained
2 (16 ounce) cans chili beans, undrained
1 (8 ounce) container sour cream

Put everything in a 7QT soup pot and bring to a boil. Reduce heat and simmer for half an hour. Remove and dice the chicken, then return it to the pot. Simmer an additional thirty minutes. Serve by itself or with dinner rolls. 

Hairbows

Here's a little sneak peak of some of the hair bows I will be selling at the craft fair.


Friday, September 24, 2010

Philly Cheesesteak Sandwiches

Sorry for the lack of pictures. It was a crazy day, and I just wanted to get dinner over with. That said, here is what you'll need:

2 lbs. Shredded beef
Minced garlic
Olive oil
1/2 Red onion, chopped

Place all the above ingredients in a crockpot on low for 8-10 hours.

Buns
1 c. Miracle Whip
1 tsp. Minced garlic
Shredded mozzarella

Mix the miracle whip and garlic and set them in the fridge until beef is tender and you're ready to assemble the sandwiches. 


Preheat the oven to 500, slather buns with miracle whip mixture, then top with meat and mozzarella cheese. Bake until cheese is melted.


Very yummy, and my favorite part... SUPER EASY!!!

Antiqued Candlesticks

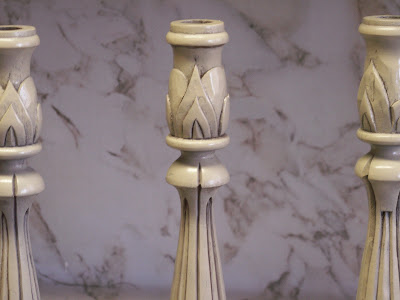
Remember these candlesticks I bought at the thrift store for 75 cents each? Well, I decided to antique them in the same almond finish I have in my dining room and put them in the curio cabinet.


I used Krylon brand almond spray paint with satin finish. I very lightly coated them from a distance twice, allowing drying time in between. 


I really like the way they came out. It was so easy.


Decorative Hemp Balls

I've seen people doing this for a long time now. I have always wanted to try it, but I'm usually not a big stickler for messy projects. And boy let me tell ya, this one is messy with a capital "M." 


You only need three things. Mod Podge, (or whatever glue you like to use) hemp, and balloons.


First blow your balloons up slightly smaller than the size ball you want. Then wrap the hemp around the balloon to figure out how much you will need.


Next pour some mod podge into a container and saturate your hemp.


Now wrap your balloon in the hemp in whatever pattern you choose. This WILL be messy!


Next lay them out to dry. Do not pop the balloons until the string is 100% dry. Otherwise, your hemp ball is likely to collapse in on itself. I would say twelve hours is a good drying time.


Now pop the balloons with a needle, and pull them out by the tied end.


Viola! These are so cute and make wonderful table decorations. You can leave them this color, spray paint them, decorate with accessories, whatever you wish. You might want to remove some of the dried glue with tweezers.

Thursday, September 23, 2010

Funky Halloween Inspired Shirt

I've been really into "scrappy" flowers lately. I love how messy and down to earth they are. It makes me think of a simpler time. With that in mind, I don't have any Halloween themed clothing. I did however find this old orange t-shirt in my closet.


I roughly cut out some different sized circles of white and green striped fabric. I don't like the perfect circles. These are much more fun, and they sort of remind me of monster eyeballs.


I sewed around the edges with a double stitch, leaving enough room for them to fray in the wash.


I used an "x" in the middle to sew them onto the shirt.


My finished product. I think this shirt is "sew" cute and fun.

Picture-less Scrapbooking

I've been way to lazy to print pictures lately, so I've been scrapbooking without them. I just try to have an idea in my mind of which pictures I'm going to use. Here is what I did the last two weeks. As soon as I get the pics, I will be sewing them on.


Craft Fair

Well, my blog editor just updated, so now I have the privilege of learning how to use it. Fun!!! Aside from that, I have decided to join a craft fair next month. It will be a lot of work getting everything done in time, but I'm doing it for a really good cause. 50% of all profits will go towards my cousin Niacole, and her husband James' adoption. If you live in the Idaho Falls area, I would encourage you to come and take a look at what I have to offer, and support this wonderful gift of a family. The craft fair will be October 14th at The Willows Assisted Living Home. In addition to all the cute stuff I plan on selling, I will also be hosting a giveaway. Here's the fun part, I want my readers to take a look around my blog and cast your vote on what you want the giveaway to be! I'm open to any and all suggestions. I don't yet know what my table number will be. I will update as soon as I find out. Thank you all for your support!

Wednesday, September 22, 2010

BUTTONS!!!

I got tired of seeing the ugly disposable soap dispenser in my guest bathroom and decided to decorate it. It's just too stinkin' cute now!

Tuesday, September 21, 2010

It's beginning to look a lot like Halloween!

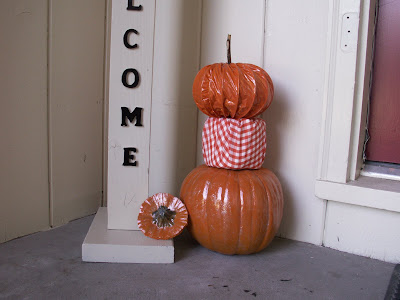
This is my first year being able to decorate for Halloween. Last year we moved into our house ON HALLOWEEN DAY!!! So naturally, I should celebrate the momentous anniversary of our first home by creating some cute decor for the front porch.


I found this welcome post at the thrift store for $4. It was white and blue with blue letters and kind of ugly. Gotta love spray paint! I used outdoor acrylic paint for the letters.

Alas, my pumpkin tower. I've seen many different variations, and loved them all. So I combined all the ideas in the blogosphere to create mine.

The top of my tower is a rolled up dryer duct that I spray painted orange, put glitter glue on, and stuck a stick through the middle.

The middle section is a roll of toilet paper covered in fabric.

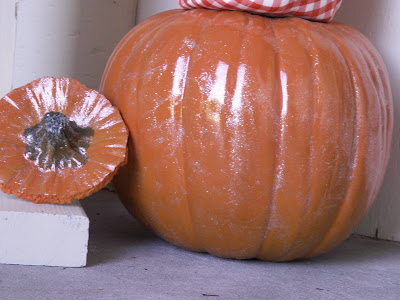
The bottom section is an actual dried out pumpkin. Even though it was already orange, I painted it to match the top anyway and put glitter on it. The top piece was cut out to make it stackable. So I just set it on the side for extra decoration.

Here's the view from my walkway. I know I have a long way to go with decorating but I really love the start.